A Linux Foundation Certified Engineer (LFCE) is prepared to install, configure, manage, and troubleshoot network services in Linux systems, and is responsible for the design and implementation of system architecture.

Introducing The Linux Foundation Certification Program.
In this 12-article series, titled Preparation for the LFCE (Linux Foundation Certified Engineer) exam, we will cover the required domains and competencies in Ubuntu, CentOS, and openSUSE:
Installing Network Services
When it comes to setting up and using any kind of network services, it is hard to imagine a scenario that Linux cannot be a part of. In this article we will show how to install the following network services in Linux (each configuration will be covered in upcoming separate articles):
- NFS (Network File System) Server
- Apache Web Server
- Squid Proxy Server + SquidGuard
- Email Server (Postfix + Dovecot), and
- Iptables
In addition, we will want to make sure all of those services are automatically started on boot or on-demand.
We must note that even when you can run all of these network services in the same physical machine or virtual private server, one of the first so-called “rules” of network security tells system administrators to avoid doing so to the extent possible. What is the judgement that supports that statement? It’s rather simple: if for some reason a network service is compromised in a machine that runs more than one of them, it can be relatively easy for an attacker to compromise the rest as well.
Now, if you really need to install multiple network services on the same machine (in a test lab, for example), make sure you enable only those that you need at a certain moment, and disable them later.
Before we begin, we need to clarify that the current article (along with the rest in the LFCS and LFCE series) is focused on a performance-based perspective, and thus cannot examine every theoretical detail about the covered topics. We will, however, introduce each topic with the necessary information as a starting point.
In order to use the following network services, you will need to disable the firewall for the time being until we learn how to allow the corresponding traffic through the firewall.
Please note that this is NOT recommended for a production setup, but we will do so for learning purposes only.
In a default Ubuntu installation, the firewall should not be active. In openSUSE and CentOS, you will need to explicitly disable it:
# systemctl stop firewalld
# systemctl disable firewalld
or
# or systemctl mask firewalld
That being said, let’s get started!
Installing A NFSv4 Server
NFS in itself is a network protocol, whose latest version is NFSv4. This is the version that we will use throughout this series.
A NFS server is the traditional solution that allows remote Linux clients to mount its shares over a network and interact with those file systems as though they are mounted locally, allowing to centralize storage resources for the network.
On CentOS
# yum update && yum install nfs-utils
On Ubuntu
# aptitude update && aptitude install nfs-kernel-server
On OpenSUSE
# zypper refresh && zypper install nfsserver
For more detailed instructions, read our article that tells how to Configuring NFS Server and Client on Linux systems.
Installing Apache Web Server
The Apache web server is a robust and reliable FOSS implementation of a HTTP server. As of the end of October 2014, Apache powers 385 million sites, giving it a 37.45% share of the market. You can use Apache to serve a standalone website or multiple virtual hosts in one machine.
# yum update && yum install httpd		[On CentOS]
# aptitude update && aptitude install apache2 		[On Ubuntu]
# zypper refresh && zypper install apache2		[On openSUSE]
For more detailed instructions, read our following articles that shows on how to create Ip-based & Name-based Apache virtual hosts and how to secure Apache web server.
Installing Squid and SquidGuard
Squid is a proxy server and web cache daemon and, as such, acts as intermediary between several client computers and the Internet (or a router connected to the Internet), while speeding up frequent requests by caching web contents and DNS resolution at the same time. It can also be used to deny (or grant) access to certain URLs by network segment or based on forbidden keywords, and keeps a log file of all connections made to the outside world on a per-user basis.
Squidguard is a redirector that implements blacklists to enhance squid, and integrates seamlessly with it.
# yum update && yum install squid squidGuard			[On CentOS]
# aptitude update && aptitude install squid3 squidguard		[On Ubuntu]
# zypper refresh && zypper install squid squidGuard 		[On openSUSE]
Installing Postfix and Dovecot
Postfix is a Mail Transport Agent (MTA). It is the application responsible for routing and delivering email messages from a source to a destination mail servers, whereas dovecot is a widely used IMAP and POP3 email server that fetches messages from the MTA and delivers them to the right user mailbox.
Dovecot plugins for several relational database management systems are also available.
# yum update && yum install postfix dovecot 				[On CentOS]
# aptitude update && aptitude postfix dovecot-imapd dovecot-pop3d 	[On Ubuntu]
# zypper refresh && zypper postfix dovecot				[On openSUSE]
About Iptables
In few words, a firewall is a network resource that is used to manage access to or from a private network, and to redirect incoming and outgoing traffic based on certain rules.
Iptables is a tool installed by default in Linux and serves as a frontend to the netfilter kernel module, which is the ultimate responsible for implementing a firewall to perform packet filtering / redirection and network address translation functionalities.
Since iptables is installed in Linux by default, you only have to make sure it is actually running. To do that, we should check that the iptables modules are loaded:
# lsmod | grep ip_tables
If the above command does not return anything, it means the ip_tables module has not been loaded. In that case, run the following command to load the module.
# modprobe -a ip_tables
Read Also: Basic Guide to Linux Iptables Firewall
Configuring Services Automatic Start on Boot
As discussed in Managing System Startup Process and Services – Part 7 of the 10-article series about the LFCS certification, there are several system and service managers available in Linux. Whatever your choice, you need to know how to start, stop, and restart network services on-demand, and how to enable them to automatically start on boot.
You can check what is your system and service manager by running the following command:
# ps --pid 1
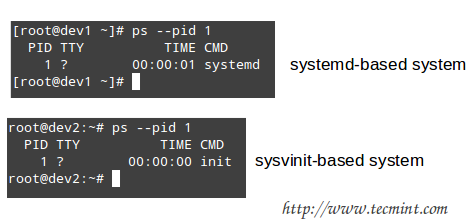
Depending on the output of the above command, you will use one of the following commands to configure whether each service should start automatically on boot or not:
On systemd-based
----------- Enable Service to Start at Boot -----------
# systemctl enable [service]
----------- Prevent Service from Starting at Boot -----------
# systemctl disable [service] # prevent [service] from starting at boot
On sysvinit-based
----------- Start Service at Boot in Runlevels A and B -----------
# chkconfig --level AB [service] on
-----------  Don’t Start Service at boot in Runlevels C and D -----------
# chkconfig --level CD service off
On upstart-based
Make sure the /etc/init/[service].conf script exists and contains the minimal configuration, such as:
# When to start the service
start on runlevel [2345]
# When to stop the service
stop on runlevel [016]
# Automatically restart process in case of crash
respawn
# Specify the process/command (add arguments if needed) to run
exec /absolute/path/to/network/service/binary arg1 arg2
You may also want to check Part 7 of the LFCS series (which we just referred to in the beginning of this section) for other useful commands to manage network services on-demand.
Summary
By now you should have all the network services described in this article installed, and possibly running with the default configuration. In later articles we will explore how to configure them according to our needs, so make sure to stay tuned! And please feel free to share your comments (or post questions, if you have any) on this article using the form below.


If you can provide LFCE mock tests that would be great.
The command listed to install apache is incorrect:
It needs an “install” directive:
@Michael,
Updated the command in the article…
Thanks for notifying us.
Hello guys, I will take LFCE this December, Is it this guide up to date? Or do you recommend me another link? I really need the guide, I passed the LFCSA using your guide.
@Isaac,
The latest updates to LFCE certificatin changes are in progress and we planning to update the book by this month end.
Thank you Ravi! I will wait anxiously.
Hi Ravi,
Do you have an LFCE study material and sample guide? I am planning to write the exam in Aug last week.
Thanks,
Manohar