Hello folks. First of all, my apologies for the delay of the last part of this cluster series. Let’s get on to work without getting any more delayed.
As we many of you have completed all three previous parts, I will brief you what we have completed so far. Now we already have enough knowledge to install and configure cluster packages for two nodes and enable fencing and failover in a clustered environment.

You can refer my previous parts if you don’t remember since it took a little longer to post the last part.
Introduction to Linux Clustering and Advantages/Disadvanges of Clustering – Part 1
How to Install and Configure Cluster with Two Nodes in Linux – Part 2
Fencing and Adding a Failover to Clustering – Part 3
We will start by adding resources to the cluster. In this case we can add a file system or a web service as your need. Now I have /dev/sda3 partition mounted to /x01 which I wish to add as a file system resource.
1. I use below command to add a file system as a resource:
# ccs -h 172.16.1.250 --addresource fs name=my_fs device=/dev/mapper/tecminttest_lv_vol01 mountpoint=/x01 fstype=ext3

Additionally, if you want to add a service also, you can by using below methodology. Issue the following command.
# ccs -h 172.16.1.250 --addservice my_web domain=testdomain recovery=relocate autostart=1
You can verify it by viewing the cluster.conf file as we did in previous lessons.
2. Now enter following entry in cluster.conf file to add a reference tag to the service.
<fs ref="my_fs"/>

3. All set. No we will see how we can sync the configurations we made to cluster among the 2 nodes we have. Following command will do the needful.
# ccs -h 172.16.1.250 --sync --activate
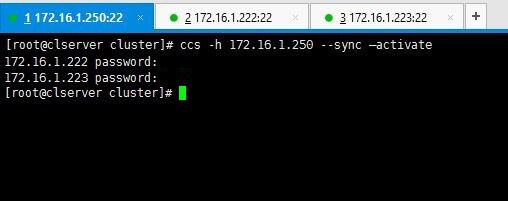
Note: Enter passwords we set for ricci in the early stages when we were installing packages.
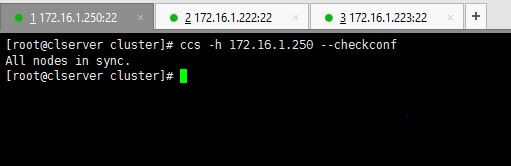
You can verify your configurations by using below command.
# ccs -h 172.16.1.250 --checkconf
4. Now it’s time to start the things up. You can use one of below commands as you prefer.
To start only one node use the command with relevant IP.
# ccs -h 172.16.1.222 start
Or if you want to start all nodes use --startall option as follows.
# ccs -h 172.16.1.250 –startall
You can use stop or --stopall if you needed to stop the cluster.
In a scenario like if you wanted to start the cluster without enabling the resources (resources will automatically be enabled when the cluster is started), like a situation where you have intentionally disabled the resources in a particular node in order to disable fencing loops, you don’t want to enable those resources when the cluster is starting.
For that purpose you can use below command which starts the cluster but does not enable the resources.
# ccs -h 172.16.1.250 --startall --noenable
5. After the cluster has been started up, you can view the stats by issuing clustat command.
# clustat

Above output says there are two nodes in the cluster and both are up and running at the moment.
6. You can remember we have added a failover mechanism in our previous lessons. Want to check it works? This is how you do it. Force shutdown one node and look for cluster stats using clustat command for the results of failover.
I have shut down my node02server(172.16.1.223) using shutdown -h now command. Then executed clustat command from my cluster_server(172.16.1.250).
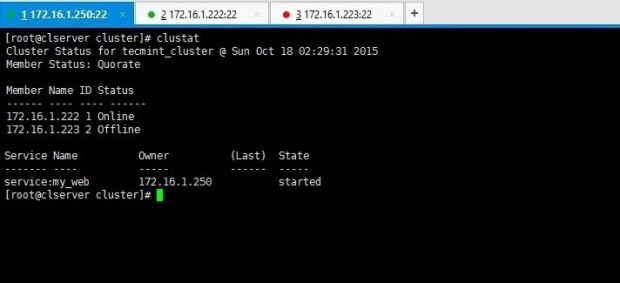
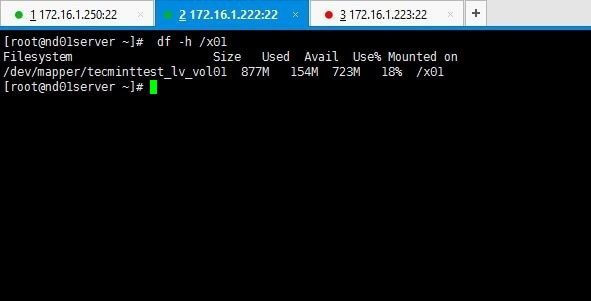
Above output clarifies you that node 1 is online while node 2 has gone offline as we shut it down. Yet service and the file system we shared are still online as you can see if you check it on node01 which is online.
# df -h /x01
Refer the cluster.conf file with whole config set relevant to our setup used for tecmint.
<?xml version="1.0"?>
<cluster config_version="15" name="tecmint_cluster">
        <fence_daemon post_join_delay="10"/>
        <clusternodes>
                <clusternode name="172.16.1.222" nodeid="1">
                        <fence>
                                <method name="Method01">
                                        <device name="tecmintfence"/>
                                </method>
                        </fence>
                </clusternode>
                <clusternode name="172.16.1.223" nodeid="2">
                        <fence>
                                <method name="Method01">
                                        <device name="tecmintfence"/>
                                </method>
                        </fence>
                </clusternode>
        </clusternodes>
        <cman/>
        <fencedevices>
                <fencedevice agent="fence_virt" name="tecmintfence"/>
        </fencedevices>
        <rm>
                <failoverdomains>
                        <failoverdomain name="tecmintfod" nofailback="0" ordered="1" restricted="0">
                                <failoverdomainnode name="172.16.1.222" priority="1"/>
                                <failoverdomainnode name="172.16.1.223" priority="2"/>
                        </failoverdomain>
                </failoverdomains>
                <resources>
                        <fs device="/dev/mapper/tecminttest_lv_vol01" fstype="ext3" mountpoint="/x01" name="my_fs"/>
                </resources>
                <service autostart="1" domain="testdomain" name="my_web" recovery="relocate"/>
                <fs ref="my_fs"/>
       </rm>
</cluster>
Hope you’ll enjoyed the whole series of clustering lessons. Keep in touch with tecmint for more handy guides everyday and feel free to comment your ideas and queries.


There are many things that don’t make sense.
The LVM that’s added, is that a shared storage between all nodes or is it local to cluster server?
If that is a local storage, what happens when the cluster server goes down. The data that’s on LVM which local to cluster server gets replicated across all nodes. If so to which location on member nodes?
Dear Brother,
Interesting lesson, I got a validation error in “ccs -h 172.16.1.250 –addresource fs name=my_fs device=/dev/mapper/tecminttest_lv_vol01 mountpoint=/x01 fstype=ext3” this part below commend I have tried “ccs -h 192.168.1.87 –addresource fs name=my_fs device=/dev/sda4 mountpoint=/test fstype=ext4” kindly need a advice the session.
Thanks
Parthiban
Hello interesting documentation friend I’m lost in this part.
ccs -h 172.16.1.250 –addresource fs name = my_fs device = / dev / mapper / tecminttest_lv_vol01 mountpoint = / x01 fstype = ext3
my question is the following one, is to know if you already have created this file system /dev/mapper/tecminttest_lv_vol01 and create it and then mount it.
Following the step 3 and ran “ccs -h 172.16.1.250 –sync –activate” but showing the error with “unable to connect to 172.16.1.222, make sure the ricci server is started”.
Then, I ran “service ricci status” for all three servers that showing “ricci (pid 1863) is running“….no idea what to do next. Please advice.
HI Thank you for your sharing about cluster.
I just got error that when I type
then make sure the ricci server is started
please help I am just newbie
Hello,
I have completed configuration till part 3.
Non cluster: 192.168.5.2
2 nodes: 192.168.5.3, 192.168.5.7
While firing this command.
It gives error: Unable to connect to 192.168.5.7, make sure the ricci server is started.
However, ricci is running on all 3 servers.
Please help me out asap.
Make sure you stopped iptables on both nodes. If you need that to be run, then add the necessary rules.
Using 3 virtual machines setup as mentioned and following the entire configuration, everything went smooth and my nodes also got successfully synced except when i tried
and it returned
SETUP DETAILS:
If remove the tag in cluster.conf file I can able to start cluster and the nodes are online but the shared drive is not showing in both of the nodes.
If I add a tag to the cluster.conf file I am getting the error message as “Validation Failure, unable to modify configuration file (use -i to ignore this error)“