VirtualBox is an open-source cross-platform virtualization software, that can be installed on any operating system to run multiple guest virtual machines on the same computer.
For example, if you install it on your Linux system, you can run Windows operating system under it as a Guest OS or run Linux OS on your Windows system, and so on. This way, you can install and run as many guest operating systems (virtual machines) as you like, the only limit is disk space and memory.
Recently Oracle released the major stable version of Virtualbox 7.0, the newest version of VirtualBox comes with so many major changes and new features added to it.
You can see the complete new changelog details about VirtualBox 7.0 on their Official Changelog Page.
This guide explains how to install VirtualBox 7.0 on RHEL-based distributions such as RHEL, Fedora, Rocky Linux, AlmaLinux, and CentOS Stream using VirtualBox’s own repository with YUM and DNF commands.
This guide also explains how to install VirtualBox 7.0 on Debian-based distributions such as Debian, Ubuntu, and Linux Mint systems using VirtualBox’s own repository with APT-GET or APT commands.
On this page:
Installing VirtualBox 7.0 in RHEL-based Systems
To install the latest stable version of VirtualBox, you need to first download the virtualbox.repo configuration file using the following wget command and then import the public key using the rpm command.
----------------- On RHEL-based Distributions -----------------
# wget https://download.virtualbox.org/virtualbox/rpm/rhel/virtualbox.repo -P /etc/yum.repos.d/
# rpm --import https://www.virtualbox.org/download/oracle_vbox.asc

----------------- On Fedora Linux -----------------
# wget http://download.virtualbox.org/virtualbox/rpm/fedora/virtualbox.repo -P /etc/yum.repos.d/
# rpm --import https://www.virtualbox.org/download/oracle_vbox.asc
Next, enable the EPEL repository to install build tools and dependencies on the system.
----------------- On RHEL-based 9 Release -----------------
# dnf install https://dl.fedoraproject.org/pub/epel/epel-release-latest-9.noarch.rpm

----------------- On RHEL-based 8 Release -----------------
# yum install https://dl.fedoraproject.org/pub/epel/epel-release-latest-8.noarch.rpm

----------------- On RHEL-based 7 Release -----------------
# yum install https://dl.fedoraproject.org/pub/epel/epel-release-latest-7.noarch.rpm
Install Dependency Packages for VirtualBox
VirtualBox uses the vboxdrv kernel module to control and allocate physical memory for the execution of guest operating systems. Without this module, you can still use VirtualBox to create and configure virtual machines, but they will not work.
So, to make VirtualBox fully functional you will need to update your system first, then install some additional modules like DKMS, kernel-headers, kernel-devel, and some dependency packages.
----------------- On RHEL-based Distributions -----------------
# yum update
# yum install binutils kernel-devel kernel-headers libgomp make patch gcc glibc-headers glibc-devel dkms -y

----------------- On Fedora Linux -----------------
# dnf update
# dnf install @development-tools
# dnf install kernel-devel kernel-headers dkms qt5-qtx11extras  elfutils-libelf-devel zlib-devel
Install VirtualBox 7.0 in RHEL-based Systems
Once you’ve installed all the needed dependency packages, you can install the latest version of VirtualBox using the following command.
# dnf install VirtualBox-7.0
OR
# yum install VirtualBox-7.0
At this point, you are ready to start using VirtualBox by running the following command on the terminal.
# virtualbox
If you get the following error during the Virtualbox installation, it means there is a conflict between the two Kernel versions.
This system is currently not set up to build kernel modules.
Please install the Linux kernel "header" files matching the current kernel
To resolve the issue, first, check your installed kernel and then update the Linux kernel by running the command:
# uname -r
# dnf update kernel-*
Or
# yum update kernel-*
When the update is complete, reboot your system and select the latest kernel from the grub boot menu, this entry is usually the first entry as you can see.
# reboot
Once the system is done with booting, log in and once again confirm that the kernel-devel version now matches the version of the Linux kernel.
# rpm -q kernel-devel
# uname -r
Then, re-start the build set-up process and confirm that your VirtualBox installation was successful by running:
# /sbin/vboxconfig
# systemctl status vboxdrv
Troubleshooting
If you get any error message like KERN_DIR or if your kernel source directory is not detected automatically by the build process, you can set it by using the following command. Make sure you change the kernel version according to your system as shown in red color.
# KERN_DIR=/usr/src/kernels/4.19.0-1.el7.elrepo.x86_64
# export KERN_DIR
Installing VirtualBox 7.0 in Debian, Ubuntu, and Linux Mint
To install the latest stable version of VirtualBox, you need to add the official Virtualbox repository using the following command.
$ wget -q https://www.virtualbox.org/download/oracle_vbox_2016.asc -O- | sudo apt-key add -
$ wget -q https://www.virtualbox.org/download/oracle_vbox.asc -O- | sudo apt-key add -
$ sudo apt install software-properties-common
$ echo "deb [arch=amd64] https://download.virtualbox.org/virtualbox/debian $(lsb_release -sc) contrib" | sudo tee /etc/apt/sources.list.d/virtualbox.list
Then, update the software package list and install the latest version of VirtualBox.
$ sudo apt-get install virtualbox-7.0
Simply execute the following command to start it from the terminal or use the launcher from the menu to start.
# virtualbox
VirtualBox 7.0 Screenshot
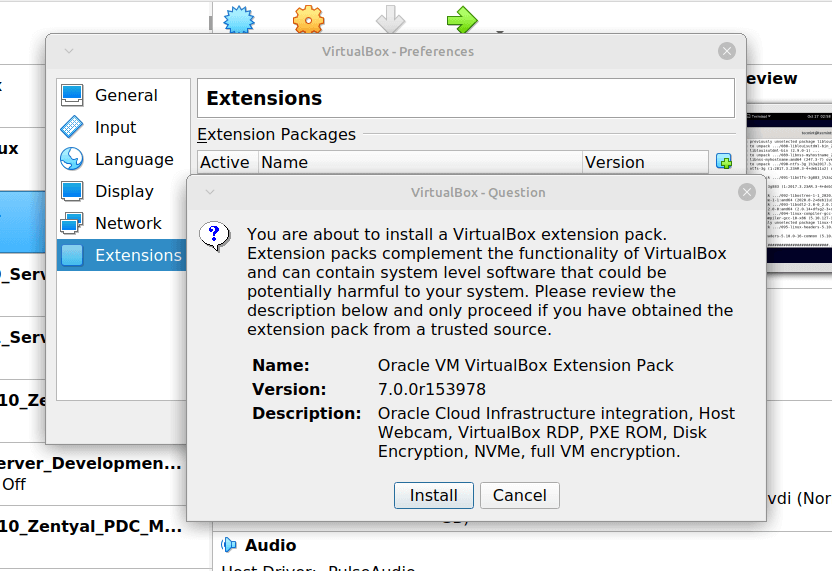
Installing VirtualBox Extension Pack in Linux
If you need some additional functionality such as VirtualBox RDP, PXE, ROM with E1000 support and USB 2.0 Host Controller support, etc. You need to download and install the VirtualBox Extension Pack using the following wget command.
# wget https://download.virtualbox.org/virtualbox/7.0.0/Oracle_VM_VirtualBox_Extension_Pack-7.0.0.vbox-extpack
To install the extension pack, you must have Virtualbox 7.0 installed, once you downloaded vbox-extpack open with Virtualbox as shown below.
If it doesn’t work out, then open Virtualbox –> File –> Preferences –> Tools –> Extension Manager and browse for the vbox-extpack to install it.
[ You might also like: How to Enable USB in VirtualBox ]
Updating VirtualBox in Linux Systems
If you want to update the VirtualBox with the latest version in the future, you can simply run the following command to update it.
On RHEL-based Systems
# yum update VirtualBox-*
On Debian-based Systems
# apt-get install VirtualBox-*
Remove VirtualBox from Linux Systems
If in case you want to remove VirtualBox completely, just use the following command to remove it completely from your system.
On RHEL-based Systems
# cd /etc/yum.repos.d/
# rm -rf virtualbox.repo
# yum remove VirtualBox-*
On Debian-based Systems
# apt-get remove VirtualBox-*
You can also Download VirtualBox 7.0 for other Linux, Windows, and Mac OS X platforms.


Credit to Gentoo Bug 912242 I had to modify BoxNetFlt-linux.c as follows:
After this, run
vboxconfig.Thank you so much. I got this setup on Centos7. So far no problems.
Thanks Ravi, got it installed, per your instructions. Now it’s off to installing a Windows 7 virtual machine. (I may be back – soon)
Installing VirtualBox 6.0 in Debian, Ubuntu and Linux Mint does not work in Linux Mint 19. Can anyone tell me how to get VirtualBox 6.0 installed?
@Guy,
Have you followed instructions provided in the article for Linux Mint? If not, follow below instructions.
Install VirtualBox 6.0 on Linux Mint 19 and Linux Mint 18.
It worked perfect. Thank you!
Hi,
I am also stuck on installing this. I have a centos7 and tried to install virtualbox. I started by downloading the virtualbox.repo and added it into my repositories.
But as soon as I type `yum update` I get a massive error:
[ROOTUSER@SERVER yum.repos.d]# yum install VirtualBox-5.1
Loaded plugins: fastestmirror, ovl
virtualbox/7/x86_64/signature | 181 B 00:00:00
Retrieving key from https://www.virtualbox.org/download/oracle_vbox.asc
virtualbox/7/x86_64/signature | 1.1 kB 00:00:00 !!!
Traceback (most recent call last):
File “/usr/bin/yum”, line 29, in
yummain.user_main(sys.argv[1:], exit_code=True)
File “/usr/share/yum-cli/yummain.py”, line 370, in user_main
errcode = main(args)
File “/usr/share/yum-cli/yummain.py”, line 179, in main
result, resultmsgs = base.doCommands()
File “/usr/share/yum-cli/cli.py”, line 583, in doCommands
return self.yum_cli_commands[self.basecmd].doCommand(self, self.basecmd, self.extcmds)
File “/usr/share/yum-cli/yumcommands.py”, line 445, in doCommand
return base.installPkgs(extcmds, basecmd=basecmd)
File “/usr/share/yum-cli/cli.py”, line 983, in installPkgs
txmbrs = self.install(pattern=arg)
File “/usr/lib/python2.7/site-packages/yum/__init__.py”, line 4825, in install
mypkgs = self.pkgSack.returnPackages(patterns=pats,
File “/usr/lib/python2.7/site-packages/yum/__init__.py”, line 1074, in
pkgSack = property(fget=lambda self: self._getSacks(),
File “/usr/lib/python2.7/site-packages/yum/__init__.py”, line 778, in _getSacks
self.repos.populateSack(which=repos)
File “/usr/lib/python2.7/site-packages/yum/repos.py”, line 347, in populateSack
self.doSetup()
File “/usr/lib/python2.7/site-packages/yum/repos.py”, line 157, in doSetup
self.retrieveAllMD()
File “/usr/lib/python2.7/site-packages/yum/repos.py”, line 88, in retrieveAllMD
dl = repo._async and repo._commonLoadRepoXML(repo)
File “/usr/lib/python2.7/site-packages/yum/yumRepo.py”, line 1479, in _commonLoadRepoXML
result = self._getFileRepoXML(local, text)
File “/usr/lib/python2.7/site-packages/yum/yumRepo.py”, line 1256, in _getFileRepoXML
size=102400) # setting max size as 100K
File “/usr/lib/python2.7/site-packages/yum/yumRepo.py”, line 1031, in _getFile
**kwargs
File “/usr/lib/python2.7/site-packages/urlgrabber/mirror.py”, line 448, in urlgrab
return self._mirror_try(func, url, kw)
File “/usr/lib/python2.7/site-packages/urlgrabber/mirror.py”, line 425, in _mirror_try
return func_ref( *(fullurl,), opts=opts, **kw )
File “/usr/lib/python2.7/site-packages/urlgrabber/grabber.py”, line 1197, in urlgrab
return self._retry(opts, retryfunc, url, filename)
File “/usr/lib/python2.7/site-packages/urlgrabber/grabber.py”, line 1086, in _retry
r = apply(func, (opts,) + args, {})
File “/usr/lib/python2.7/site-packages/urlgrabber/grabber.py”, line 1191, in retryfunc
_run_callback(opts.checkfunc, obj)
File “/usr/lib/python2.7/site-packages/urlgrabber/grabber.py”, line 1054, in _run_callback
return cb(obj, *arg, **karg)
File “/usr/lib/python2.7/site-packages/yum/yumRepo.py”, line 1728, in _checkRepoXML
self.gpg_import_func(self, self.confirm_func)
File “/usr/lib/python2.7/site-packages/yum/__init__.py”, line 6418, in getKeyForRepo
self._getAnyKeyForRepo(repo, repo.gpgdir, repo.gpgkey, is_cakey=False, callback=callback)
File “/usr/lib/python2.7/site-packages/yum/__init__.py”, line 6337, in _getAnyKeyForRepo
if hex(int(info[‘keyid’]))[2:-1].upper() in misc.return_keyids_from_pubring(destdir):
File “/usr/lib/python2.7/site-packages/yum/misc.py”, line 599, in return_keyids_from_pubring
for k in ctx.keylist():
gpgme.GpgmeError: (7, 32870, u’Inappropriate ioctl for device’)
Can you maybe help me?
@Ruth,
To fix, open and edit the file /etc/yum/pluginconf.d/rhnplugin.conf and change enabled to
0and then do.Please have a look at /var/log/vbox-install.log to trace why the build process failed
Run the following commands to build the kernel modules correctly : ( I am using RHEL -7)
YOU ARE ALL SET TO GO.
Hey i am stuck installing VirtualBox please help!
What should i do getting this vboxdrv.sh: failed: modprobe vboxdrv failed. Please use ‘dmesg’ to find out why.
Below mentioned is my /var/log/vbox-install.log file-
make KBUILD_VERBOSE=1 SUBDIRS=/tmp/vbox.0 SRCROOT=/tmp/vbox.0 CONFIG_MODULE_SIG= -C /lib/modules/3.10.0-514.el7.x86_64/build -j4 modules
arch/x86/Makefile:96: stack-protector enabled but compiler support broken
Makefile:641: Cannot use CONFIG_CC_STACKPROTECTOR_STRONG: -fstack-protector-strong not supported by compiler
make[1]: gcc: Command not found
make[1]: warning: -jN forced in submake: disabling jobserver mode.
test -e include/generated/autoconf.h -a -e include/config/auto.conf || ( \
echo >&2; \
echo >&2 ” ERROR: Kernel configuration is invalid.”; \
echo >&2 ” include/generated/autoconf.h or include/config/auto.conf are missing.”;\
echo >&2 ” Run ‘make oldconfig && make prepare’ on kernel src to fix it.”; \
echo >&2 ; \
/bin/false)
mkdir -p /tmp/vbox.0/.tmp_versions ; rm -f /tmp/vbox.0/.tmp_versions/*
make -f scripts/Makefile.build obj=/tmp/vbox.0
gcc -Wp,-MD,/tmp/vbox.0/linux/.SUPDrv-linux.o.d -nostdinc -isystem -I./arch/x86/include -Iarch/x86/include/generated -Iinclude -I./arch/x86/include/uapi -Iarch/x86/include/generated/uapi -I./include/uapi -Iinclude/generated/uapi -include ./include/linux/kconfig.h -D__KERNEL__ -Wall -Wundef -Wstrict-prototypes -Wno-trigraphs -fno-strict-aliasing -fno-common -Werror-implicit-function-declaration -Wno-format-security -fno-delete-null-pointer-checks -std=gnu89 -O2 -m64 -mno-mmx -mno-sse -mno-red-zone -mcmodel=kernel -maccumulate-outgoing-args -Wframe-larger-than=2048 -pipe -Wno-sign-compare -fno-asynchronous-unwind-tables -fstack-protector-strong -fno-omit-frame-pointer -fno-optimize-sibling-calls -g -pg -include /tmp/vbox.0/include/VBox/SUPDrvMangling.h -I/lib/modules/3.10.0-514.el7.x86_64/build/include -I/tmp/vbox.0/ -I/tmp/vbox.0/include -I/tmp/vbox.0/r0drv/linux -I/tmp/vbox.0/vboxdrv/ -I/tmp/vbox.0/vboxdrv/include -I/tmp/vbox.0/vboxdrv/r0drv/linux -D__KERNEL__ -DMODULE -DRT_OS_LINUX -DIN_RING0 -DIN_RT_R0 -DIN_SUP_R0 -DVBOX -DRT_WITH_VBOX -DVBOX_WITH_HARDENING -DSUPDRV_WITH_RELEASE_LOGGER -Wno-declaration-after-statement -DCONFIG_VBOXDRV_AS_MISC -DRT_ARCH_AMD64 -DVBOX_WITH_64_BITS_GUESTS -fno-omit-frame-pointer -fno-pie -DMODULE -D”KBUILD_STR(s)=#s” -D”KBUILD_BASENAME=KBUILD_STR(SUPDrv_linux)” -D”KBUILD_MODNAME=KBUILD_STR(vboxdrv)” -c -o /tmp/vbox.0/linux/.tmp_SUPDrv-linux.o /tmp/vbox.0/linux/SUPDrv-linux.c
/bin/sh: gcc: command not found
thanks, so quick so helpful ..