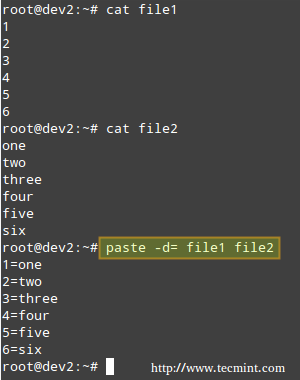
Merging Lines with paste
The paste command merges files line by line, separating the lines from each file with tabs (by default), or another delimiter that can be specified (in the following example the fields in the output are separated by an equal sign).
# paste -d= file1 file2
Breaking a file into pieces using split command
The split command is used split a file into two (or more) separate files, which are named according to a prefix of our choosing. The splitting can be defined by size, chunks, or number of lines, and the resulting files can have a numeric or alphabetic suffixes. In the following example, we will split bash.pdf into files of size 50 KB (-b 50KB), using numeric suffixes (-d):
# split -b 50KB -d bash.pdf bash_

You can merge the files to recreate the original file with the following command:
# cat bash_00 bash_01 bash_02 bash_03 bash_04 bash_05 > bash.pdf
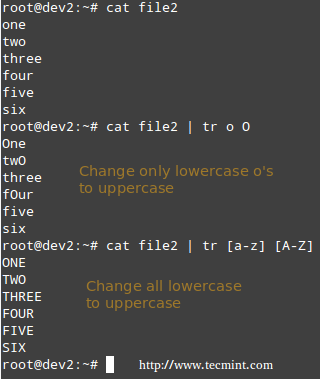
Translating characters with tr command
The tr command can be used to translate (change) characters on a one-by-one basis or using character ranges. In the following example we will use the same file2 as previously, and we will change:
- lowercase o’s to uppercase,
- and all lowercase to uppercase
# cat file2 | tr o O
# cat file2 | tr [a-z] [A-Z]
Reporting or deleting duplicate lines with uniq and sort command
The uniq command allows us to report or remove duplicate lines in a file, writing to stdout by default. We must note that uniq does not detect repeated lines unless they are adjacent. Thus, uniq is commonly used along with a preceding sort (which is used to sort lines of text files).
By default, sort takes the first field (separated by spaces) as key field. To specify a different key field, we need to use the -k option. Please note how the output returned by sort and uniq change as we change the key field in the following example:
# cat file3
# sort file3 | uniq
# sort -k2 file3 | uniq
# sort -k3 file3 | uniq

Extracting text with cut command
The cut command extracts portions of input lines (from stdin or files) and displays the result on standard output, based on number of bytes (-b), characters (-c), or fields (-f).
When using cut based on fields, the default field separator is a tab, but a different separator can be specified by using the -d option.
# cut -d: -f1,3 /etc/passwd # Extract specific fields: 1 and 3 in this case
# cut -d: -f2-4 /etc/passwd # Extract range of fields: 2 through 4 in this example
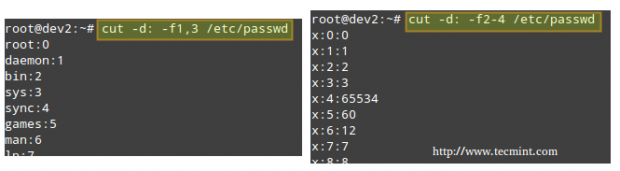
Note that the output of the two examples above was truncated for brevity.
Reformatting files with fmt command
fmt is used to “clean up” files with a great amount of content or lines, or with varying degrees of indentation. The new paragraph formatting defaults to no more than 75 characters wide. You can change this with the -w (width) option, which set the line length to the specified number of characters.
For example, let’s see what happens when we use fmt to display the /etc/passwd file setting the width of each line to 100 characters. Once again, output has been truncated for brevity.
# fmt -w100 /etc/passwd

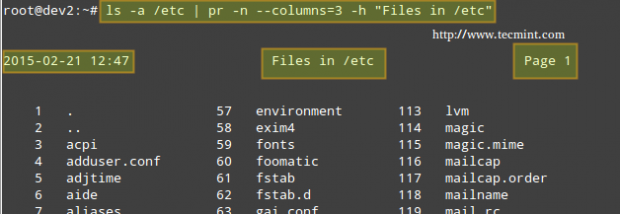
Formatting content for printing with pr command
pr paginates and displays in columns one or more files for printing. In other words, pr formats a file to make it look better when printed. For example, the following command:
# ls -a /etc | pr -n --columns=3 -h "Files in /etc"
Shows a listing of all the files found in /etc in a printer-friendly format (3 columns) with a custom header (indicated by the -h option), and numbered lines (-n).
Summary
In this article we have discussed how to enter and execute commands with the correct syntax in a shell prompt or terminal, and explained how to find, inspect, and use system documentation. As simple as it seems, it’s a large first step in your way to becoming a RHCSA.
If you would like to add other commands that you use on a periodic basis and that have proven useful to fulfill your daily responsibilities, feel free to share them with the world by using the comment form below. Questions are also welcome. We look forward to hearing from you!


Today i attempted RHCSA exam. In that LDAP + AutoFS configuration done, but when i tried to login with ldapuser, it has given error message “Permission denied“. I tried all the way to rectified it but no luck.
Second question was to create LV, PV, VG, but when i tried to create PV, it given error message “value of range. LV was 8*100 size“. Can you identify this issue?
I am worrying about my result.
How to deny 1.1.1.1 ip address to access proxy services and allow to access all ather services??
@Ashok,
Install a Firewall, and block the IP address of Proxy server, that’s it.